Tuesday, June 29, 2010

Ordinarily Goes Un-Scrapped...

Hey there!! I'm back again with a post using lots of awesome products from Helmar USA and Buzz and Bloom!!

Have I told you lately how much I love using Helmar products? Helmar 450 Quick Dry Adhesive is at the top of my list...oh my goodness, I love using it on chipboard--it dries clear and it holds very well! I also used Helmar Quick-Fix Permanent Runner on the papers and Helmar Premium Craft Glue is absolutely fabulous for the fabric!

I used a bunch of Buzz & Bloom's fabulous products on this layout. For the title, I used COR - Garden Notes (Black) which I spritzed with a color spray. I inked the CB - Vette Alpha Lower Case and the added rub-ons after the inked dried. I inked the CB - Beaded Curtain and then added it just beneath the title to finish it off.

050210 008

I spritzed one of the CB - Buttons with a color spray and then layered it on the COR- In Bloom (Chocolate) that I sprayed with a color spray to form a flower. I topped it off with a flower center from Petaloo. I made a "leaf" by tucking a FAB - Heart Throb (Indigo) beneath the flowers.

050210 010

I spritzed the CB - Slide Show - Negatives with a color spray and then inked the edges to make it pop against the background and then used it to frame my photo.

050210 011

The tag at the top folds down to reveal some of my nicknames.

050210 012

Thanks for taking a peek! I hope this post inspired you to pull out your Buzz & Bloom and Helmar products and add them to your next project!


Until next post...happy scrapping!


Sunday, June 27, 2010

Scrap-Tacular Helmar

Hey there and happy Saturday!!

Today, I'm featuring a project I created for Scrap-Tastic week over at Helmar! The entire Design Team had the opportunity to work with this Scrap-Tacular kit and this is what I came up with.

All of the summery goodness inside this kit brought to mind a photo that I'd taken of Donovan in Jamaica a few summers ago. All of the elements worked perfectly with the colors in the photo, too.

I used Purple Cows 2-1n-1 Combo Trimmer, Helmar Premium Craft Glue, Helmar Quick-Fix Adhesive Runner and Zapdots (black) to put together this fun layout!

PoolfunLO

I used Helmar Premium Craft Glue to layer 2 buttons from the kit; the top one was threaded with twine first. Now that I have Helmar, anytime I add a bow to my project, I put Premium Craft Glue on the knot so I don't have to worry about it unraveling. The great thing is it dries clear and no one knows it's there!


061710 080

There was no way in the world I was going to stitch all 30+ buttons seen here...insert more Helmar Premium Craft Glue and I have a very cute, very textured sun in just a few short minutes! I squeezed a generous amount of adhesive around the sun and started adhering the buttons. I popped the sun up on Zapdots so that it would really stand out.
061710 078

I love how many different uses I got out of the Fancy Pants Rustic Sun Paper! I hand cut journaling AND 3 embellishments from it! I adhered the button to this palm tree with premium craft glue and added zapdots to the upper half.

061710 079


I used a Pink Paislee rub-on from my stash to highlight Donovan in the photo. When I first applied it, it was way too over powering. I used a piece of scotch tape to remove the rub-on in some sections; it still draws the eye to the area, without being distracting.


-------------------------------------------------------------------------------

Here's a cute little wedding card I created for Petaloo using the Celebrations line. The flowers and embellishments are great additions to any project!

Thanks for stopping by!

Have a great first (official) Weekend of SUMMER!!!


Friday, June 25, 2010

This Is How I Do It | Buzz & Bloom & Helmar

Here's a project I created for Buzz & Bloom a while ago.

The DT was given an assignment to scrap our "scrap process". I had to think long and hard about this because there's really no particular order in which I scrap, so I figured...why not scrap that?

I pulled out papers in my favorite colors (to scrap with) and went to town. I decided to go photo-less which left PLENTY of space to load up my layout with Buzz & Bloom products!!

Everything on this layout was adhered using Helmar USA products: Helmar Premium Craft Glue for the fabric, Helmar 450 Quick Dry Adhesive for the chipboard, and Helmar Quick-Fix Permanent Adhesive Runner for the papers.

journaling: I can’t really say that there’s a method to my madness when it comes to scrapping. Sometimes, I’ll get in the mood to scrap, but don’t know where to start. That’s when I’ll go lurking on my favorite online sites, scrap blogs or magazines for inspiration. Other times, pictures or certain patterned papers get me in the mood, so I’ll start there. There have even been times where I just start with the journaling and work the rest of the page around it. Once I figure out “step one”, I then work on gathering possible embellishments to use. It’s always hard for me to use a small amount, so my projects usually have a lot going on, but I don’t care…as long as it’s pleasing to me! I’ll usually try to pull out more papers to use because I love bringing together a lot of different patterns. At this point, I’ll also incorporate punched borders and/or paper tearing because I love the effects. Next, I work on positioning. I’ll lay everything out and get the positioning and sizes just right, but then end up having to move things to add adhesive and of course the page never looks the same as it did when it wasn’t adhered. Once everything comes together, I stare at the project to see what else can be done to make each individual element its own “masterpiece”. Once I’m satisfied with how everything looks, I’ll let the project sit out overnight and then look at it again the next day. If I’m pleased, I’ll then photograph it, post it online and then place it in the “completed” pile.

In order to add interest to the title, I mixed it up a bit with CB Vette - Lower Case covered with patterned paper and CB Pop Artist Alphabet painted with twinkling H2O's. I ran out of CB Vette - Lower Case "e's", but not a problem, I simply cut around the negative space and then used Helmar's Premium Craft Glue to adhere them to FAB Writer's Block - The George (Avocado), trimmed off the excess and added pearls to the centers. CB Beaded Curtain painted with Creative Imaginations Chestnut Brown Twinkling H2Os really helps the title pop.


I created a visual triangle with FAB Blame It On The Sunshine (Blush). Before adhering the flowers to the layout, I sprayed them with color spray, crinkled them, and .finished off the look with brads.


I layered the remaining piece of FAB Writer's Block - The George (Avocado) with CB Vette Alphabet - Lower Case and CB Shelby Alphabet - Lower Case that have been sprayed with color spray and inked with brown chalk ink.


I absolutely LOVE the CB Butterflies, so I tossed in a couple of those, too! Why not? LOL!


supplies: patterned paper: Graphic 45, Jenni Bowlin, Jillibean Soup; chipboard, fabric pieces,- Buzz & Bloom; brads- Karen Foster, K & Co; ink- Clearsnap; paint- Creative Imaginations Twinkling H2Os; Die cut paper- Jenni Bowlin; pearls- Queen & Co; pen- sharpie; acetate sign- Maya Road; border punch- EK Success, Martha Stewart; Adhesive Helmar Quick Fix Permanent Adhesive Runner; Helmar 450 Quick Dry Adhesive; Helmar Premium Craft Glue

Thanks so much for stopping by the blog today and leaving such sweet comments!


Wednesday, June 23, 2010

Two Days Of Creativity

The past 2 days have proven to be very productive, scrapwise. I love it when the mojo is free flowing and even more so when a project that I pictured in my head looks even better in person!

That's what happened with this dress form. When I received it in the mail from Creative Imaginations, I was excited because I've been wanting to alter one badly! I didn't know exactly what I wanted to do with it...and then the other day it hit me...create a Prima Ballerina!!! Thinking about it, I thought I was going to go with pink or white tulle, until I saw this shiny teal tulle in Joann's Fabric and Crafts this morning.

I came home and spent about 4 hours (includes drying time) and this is how it turned out! I LOVE it...and let me tell you, the photo doesn't do it justice!

This tutu is made up of 94 - 2" x 11" pieces of tulle. I loosely tied a piece of ribbon around the waist and then looped a double strand of tulle around it until the entire piece of ribbon was covered.

This is the top view. Here you can see all of the pretty Petaloo flowers that I used on it! (Celebrations Ribbon Florettes, Celebrations Glittered Flowers, Jeweled Florettes, Color Me Crazy Jeweled Florettes)


I painted the body of the dress form, brown and the stand, white and then I went over it with Creative Imagination's Twinkling H2Os in sunflower.

I outlined the bodice with a pencil, filled it in with Helmar's Gemstone Glue and then coated with black glitter. Gemstone glue is not just for gemstones! I sprayed the glittered bodice with CI's Super Seal so it doesn't fall off.

Petaloo's ribbon florettes made was the perfect addition to the waistline.

It's hard to see this in the first photo, but this is bottom of the stand. I found this Scenic Route rub-on in my stash and thought it was quite appropriate. I was hard as heck to get that thing on this rounded bottom, though.

What's a Prima Ballerina without bling? I fashioned this necklace from a gem and an adhesive strip of pearls.

I will have to find a special place in my scrap room for this...it reminds me of how much I wanted to be a dancer when I was a little girl.

-------------------------------------------------------------

I made the next 2 projects yesterday using Pink Paislee's new Starlight collection. I say this all the time about their papers...they are so versatile! I made a sports layout and and Independence Day card from the same papers and they both work very well!

I took these photos of Donovan at his first karate tournament and of course I could resist using that title...especially since we saw (and loved) the movie!


This is a card that I whipped up pretty quickly before I went to bed last night from the scraps on my table. It's hard to tell from the photo, but I filled in the stars with stardust stickles. I think the tan ribbon really added the right touch.

I hope you've enjoyed these projects! Until next post...happy scrapping!


Monday, June 21, 2010

Out Takes

Every so often, I try to get some updated pictures of the boys. I swear, the older they get, the tougher it is to get a nice photo. They have to be the antsiest kids alive...and trying to pry the bag of chips (or whatever Xander seems to be eating at the time) out of his hands is virtually impossible. I've gotten tired of getting frustrated and have decided to just go with the flow! The out takes get funnier and funnier, so why not just live in the moment and let it be. Right?

I did manage to get this photo of my cutie pies. They're both looking at the camera and that makes it a good enough photo in my book!

This one started out as an outtake, but I cropped Donovan out and I like it!


We had just returned from Donovan's end of the season soccer party and he wanted his trophy in every photo.

Xander is tearing those chips up! Finger licking good!

...the two of them look like drunken old men here!

If only Xander's eyes were looking at the camera...


...and then there's this photo! What can I say about this except it makes me laugh out loud?!


That's my crazy boys for you!!!

Until next post...

Saturday, June 19, 2010

And The Winner Is...

First, I just want to say thanks to everyone who participated in our Farewell Blog Hop. As I stated in yesterday's post, it was a sad decision for me not to reapply for the design team, but I know the new team is gonna rock it out!!

Secondly, here is my final My Little Shoebox project...as a DT member. I actually taught this mini album at the Collin's Show earlier this Spring. I used Flying High along with some of my favorite family photos to create this album, one of my faves to date!

I had some awesome companies (posted here) donate product for this class!!

I used 2 die cut photo corners and a piece of ribbon to fashion a butterfly


I adhered a piece of lined paper to the die cut, punched holes in it and then added journaling to the back--the tag is actually it's own page.

I matted a heart and then added wings (2 more photo corners) to help bring the sentiment to life.

See the white butterfly on the right page? I punched it out of the transparency overlay with my Martha Stewart butterfly punch.


I created a pocket for journaling tags using 1/4 of the scalloped circle paper


The END...


Oh yeah, you want to know which lucky blog poster won my RAK, right!?! LOL!

Well that person is.....

Kim M said...

Darling cards, so sad to see you but have enjoyed your work with MLS!


Congratulations!! Please email your address to me at Tanisharenee74@hotmail.com and I will get your RAK out to you ASAP!


All winners will be listed on the MLS blog on Monday, so check there to see if a RAK is making its way to you.
Come back and visit soon!!!


Friday, June 18, 2010

My Little Shoebox Farewell Blog Hop

Hey there!! Welcome to My Little Shoebox's Farewell Blog Hop! If you've hopped here from Robyn's fabulous blog, then you are well on your way and will continue to be treated to some wonderful eye candy from our terrific DT members!!

If you just happened to pop in on my blog, join us...I guarantee you'll have a great time. Just go back to My Little Shoebox's blog and start from there. Be sure to leave comments on each blog and make it all the way to the end of the hop for a chance to win RAKs from DT members and an AMAZING prize pack from My Little Shoebox!!!

This farewell blog hop is a bittersweet end to a wonderful era for me. I have been with this amazing company for a little over 2 years and decided not to reapply for the Design Team to make room for the mind blowing talent who I'm sure will WOW you with their creations using the upcoming collections!


I created these cute little cards using Flying High. I adore the bright colors and fun images of this line!


supplies: patterned papers, die cuts- My Little Shoebox; cardstock- American Crafts, Bazzill; adhesive- Helmar Zapdots, Helmar 450 Quick Dry Adhesive, Quick-Fix Permanent Adhesive Runner; stickles- Ranger; ribbon- Bo Bunny, Morex; pearls- Want 2 Scrap; ink- clearsnap; stamps- My Stamp Box; trimmer, designer click blades- Purple Cows

Anyone who leaves a comment on this post during the blog hop will be eligible to win a RAK of MLS minis and overlays from me! Winners will be announced here and on My Little Shoebox's blog tomorrow (Saturday)!


Now it's time to hop on over to Gretchen's wonderful blog.


Have fun and good luck!!!


Wednesday, June 16, 2010

My New Loves...

1. zumba

2. yoga

3. waking up at 7:45 am as opposed to 6:15 am

4. cherry vanilla pepsi

5. The Office reruns

Tuesday, June 15, 2010

Almost Father's Day

I'm having a hard time believing that the year is almost half over! In just 2 weeks, school lets out for the summer. Donovan will no longer be a kindergartner...he'll be on his way to first grade. Unbelievable!

This Sunday is Father's Day! Hats off and big hoorays to all the Father's who are making a difference in their children's lives just merely by being present!!!

Father's Day always makes me sad. You see, I never really had the relationship that I wanted with my dad. The first time I remember meeting him, I was 10 years old and he was married with 4.5 children (his wife was pregnant). I later found out that he had 2 other children (so 8 of us in all and believe it or not, we're all pretty close knit). I always wanted to be a daddy's girl, but I didn't have the opportunity and I never will since my dad died the year I graduated from college. Even as a grown, 30-something year old woman, I still feel a slight tinge of jealousy toward women who have the opportunity to have a wonderful relationship with their fathers . I always get a lump in my throat whenever I hear Luther Vandross's song "Dance With My Father" because it's something that I never had the chance to do...and will never do in this lifetime.

I'm happy that my boys don't have to feel that way. They have an awesome dad who loves them so much. He works very hard to not only show his sons the way a man handles business, but also the young men in his school and on his basketball team that look to him for guidance. He's a great mentor, a disciplinarian...and a roller coaster ride (LOL). I can't tell you how many times in a day I hear fits of giggles followed by pleas of "do it again daddy"! As soon as they hear him arm the alarm on his car, they drop whatever they are doing and bolt to the front door. I'm sure even the neighbors can hear the loud "daddy's home" squeals!

I made a few projects in celebration of the man in my life.

First up is a card that I made for Bella Blvd's winter CHA booth. I posted it here before, but I thought I'd post it again since I made it for the boys to give to their dad on Father's Day. I used Bella Blvd's ROCKIN' line, Man Of The House. This is one of my favorite product lines--as you know I live in a house full of testosterone and need lots of awesome masculine supplies in my stash.

The guy here is actually an old SEI iron-on. I ironed it onto a transparency and them traced the pieces onto patterned paper, cut them out, and adhered them to the back of the transparency. It took a lot of patience (something I have very little of on most days), but I like how it turned out.


The next 2 projects were created for the June issue of Bella Blvd's newsletter. If you don't receive the newsletter, just head over to the website and sign up. Each issue is loaded with inspiration and all of the latest Bella news!

I took these photos of the boys and Troy this past Easter and have been dying to scrap them. Although they aren't the "perfect" shots, I love how comfortable they all look together.

I used more products from the Man Of The House line (the houndstooth paper is from Camped Out).

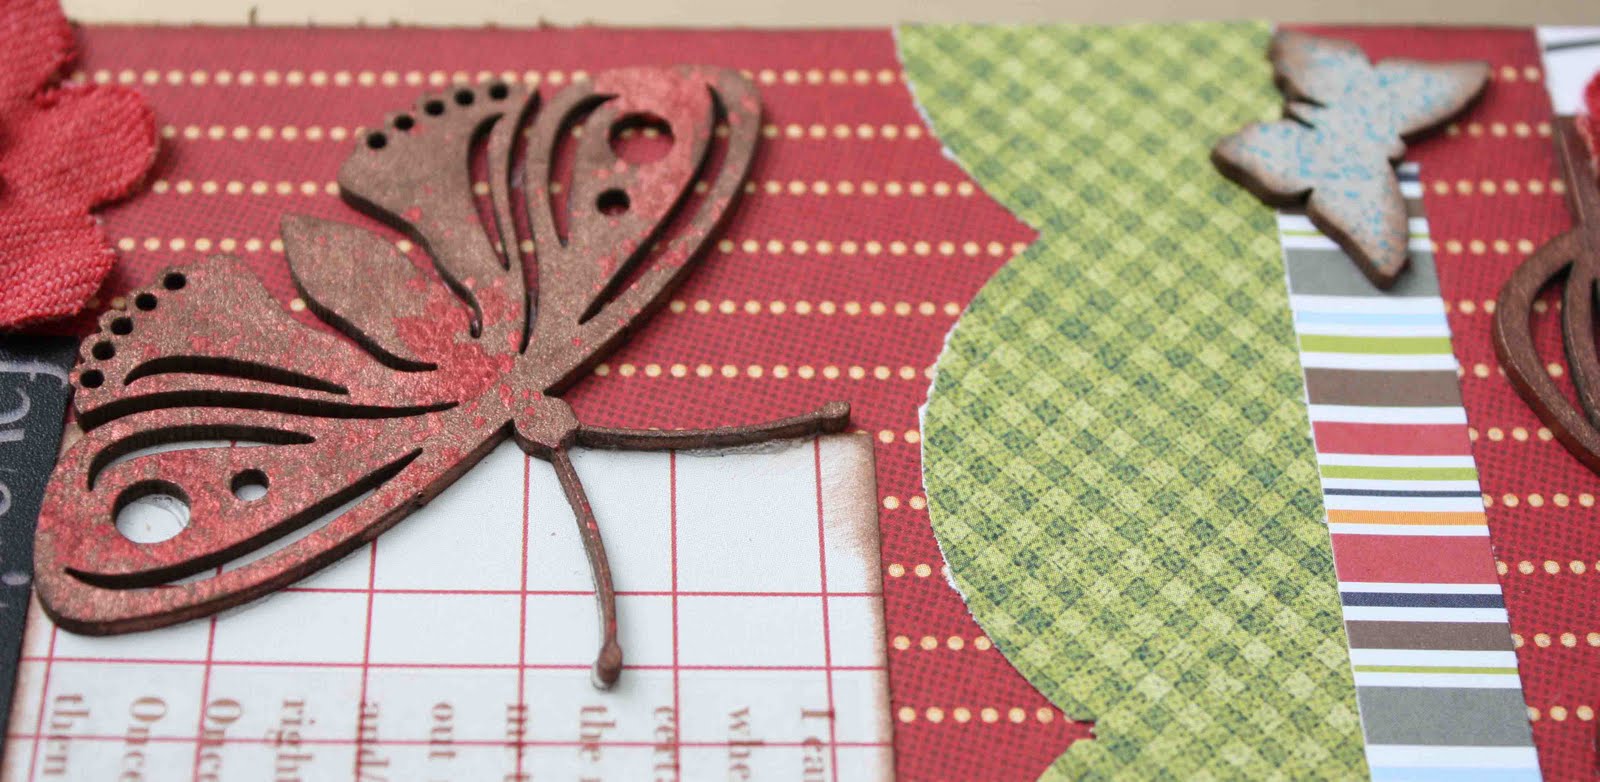
close-up of the title

I was still able to keep this layout masculine although I added a flower. I simply took out the yellow layers (the flower was yellow and brown), scrunched it up for dimension, and added a chipboard button tied with jute to the center.

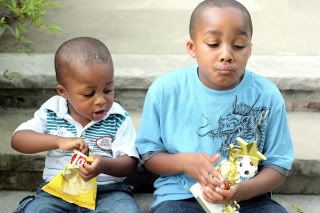
Finally, I created this simple layout of my little man, who will one day be a father himself. I wanted to keep this layout simple, but colorful and the color blocking helped me to achieve just that.

I snapped this picture of Xander at one of Donovan's soccer games. He such a boy...wild and destructive, ornery yet sweet!

here's a close-up of the flower and pleated ribbon


I layered alphabet stickers in different colors to add a dimensional effect without the bulk.


Hope you've enjoyed these projects about the men in my life! Until next post...happy scrapping!

Blog Widget by LinkWithin

My photo
I live in New Jersey with my husband and our 2 sons. I work full time as a Medical Technologist and volunteer for the Community Emergency Response Team in my town. I've been scrapping for the past 8 years and I truly love it because it allows me to combine my love of photography and my love of paper into one art form. I love teaching scrapbook classes and providing freelance work. Please contact me via email if you are interested in commissioning my services: tanisharenee74@hotmail.com

All content, including text, photographs, and artwork are copyright 2011 by Tanisha R. Long (except where noted). My original artwork is shared for personal inspiration only, not for commercial use. This includes contests, submissions, and publications. Any other use requires my expressed written consent.
MyFreeCopyright.com Registered & Protected

My Favorite Projects

Twitter


FEEDJIT Live Traffic Feed

Blog Archive

Labels